How to Rename a Block in AutoCAD
Learn how to rename a block in AutoCAD with the RENAME command, wildcards, and -RENAME, plus quick fixes when a block won't...
You selected the block. You pressed Delete. It vanished from the screen, and you felt great for about four seconds. Then you opened the block list and there it was again, sitting there like nothing happened, and your file size hasn’t budged.
Don’t worry, nothing is broken. This is the single most common surprise when people learn how to delete blocks in AutoCAD: removing a block from the drawing and removing it from the file are two different jobs. If you’re still getting comfortable with the software, is AutoCAD hard to learn? will tell you that confusion like this is completely normal.
Short Answer: How do you delete blocks in AutoCAD?
First, erase every copy of the block from your drawing (select it and press Delete). Then type PURGE, tick Blocks, tick Purge nested items, and click Purge Checked Items. Erasing removes the copies you can see, and PURGE removes the hidden block definition that stays in the drawing until you clean it out.
That’s the whole recipe. Now let’s walk through it properly, and then fix the cases where PURGE refuses to cooperate, because that’s where most people get stuck.
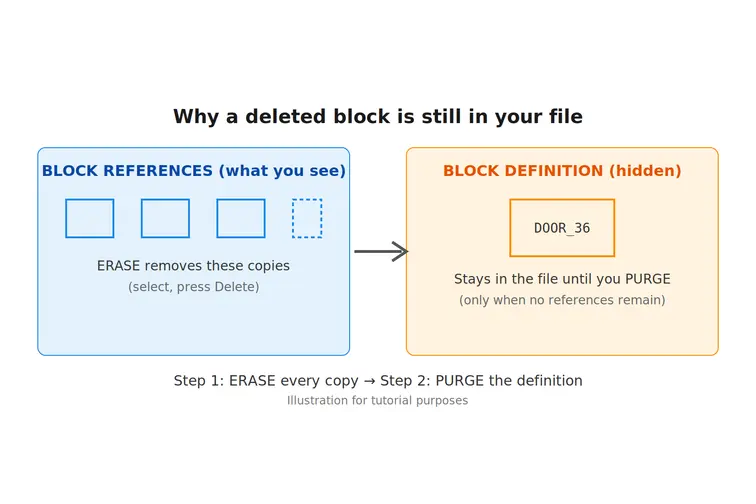
Here’s the idea that makes everything click. A block has two parts:
When you press Delete, you only remove references. The definition stays behind in the drawing’s database, quietly adding to your file size, until you purge it. And AutoCAD won’t let you purge a definition while any reference to it still exists. So the order always matters: erase first, purge second.
This is the quick one. Click the block, press Delete (or type ERASE). Only that copy disappears. Handy when you want to remove one door from a floor plan, but not when you’re cleaning out a block entirely.
Say your drawing has 200 copies of DOOR_36 and you want them all gone. Clicking each one is no way to spend an afternoon.
QSELECT and press Enter.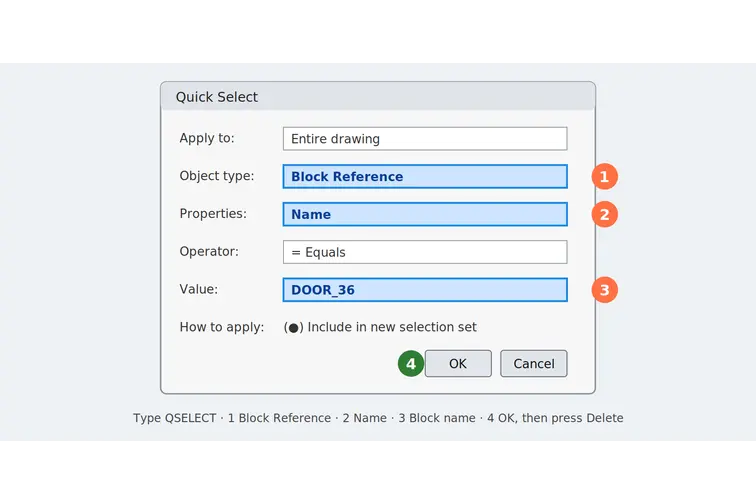
One catch: objects on frozen layers aren’t selected, and objects on locked layers can’t be erased. If some copies survive, thaw and unlock your layers and run it again.
Now the real cleanup. This is the part that answers how to delete blocks in AutoCAD for good.
PURGE and press Enter. (In some versions you’ll find it under Application menu, Drawing Utilities, Purge.)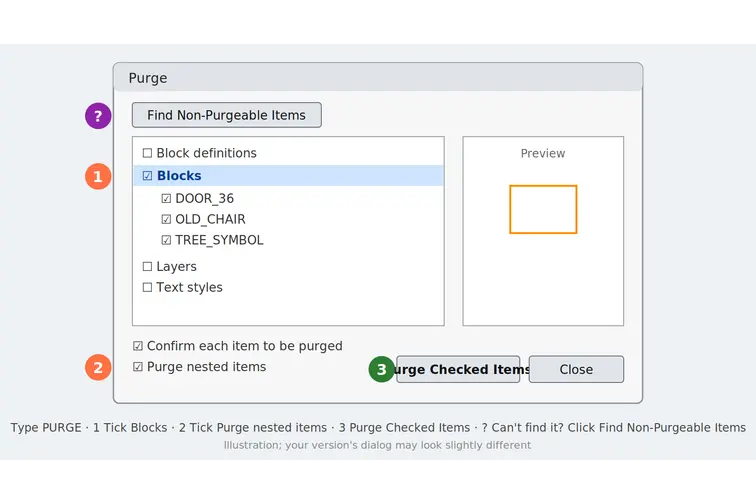
The block is now actually gone from the file. Save the drawing and you’ll often see the size drop.
If you prefer typing, or you’re building a script, use -PURGE. Choose Blocks, enter * to purge all of them (or type one name), and answer N if you don’t want to confirm each one. Same result, no dialog.
Some drafters get a clean copy by running WBLOCK, choosing Entire drawing, and saving it as a new file. The new file generally holds only what’s actually in use. It’s a good last resort for stubborn drawings, but open the new file and check it before you replace anything.
Let’s go through the usual suspects, because this is the complaint I hear most.
A little caution saves a lot of regret.
Save a copy first. If you’re deleting a lot, use Save As and keep the old version. If you spot a mistake right away, UNDO can help, but a backup is more reliable.
Check you want it gone. Purge removes only unused items, but “unused in this drawing” isn’t the same as “useless”. A block you plan to insert next week will have to be brought in again.
Deleting a block here doesn’t touch other files. If you saved that block as its own file with WBLOCK, that file stays exactly where it is. Likewise, deleting a definition doesn’t delete the library it came from.
Once you know how to delete blocks in AutoCAD, the best move is to stop them piling up in the first place:
PURGE before you send a drawing to anyoneIf you’re building your skills from the ground up, the step-by-step AutoCAD 2D learning guide shows where drawing cleanup fits into a real workflow. And if your files are large civil or site drawings, the cut and fill in AutoCAD guide is a natural next read, since bloated files hurt most on big projects.
For more guidance, you can watch this video: How to delete blocks in AutoCAD video.
Q1: How do I delete a block in AutoCAD completely?
Erase every copy of the block, then run PURGE, tick Blocks and Purge nested items, and click Purge Checked Items. Erasing alone leaves the block definition in the file.
Q2: Why can’t I purge a block in AutoCAD? Because something still uses it. Common causes are a copy on a frozen or locked layer, a copy in another layout, a nested block, or a dimension or leader style using it. Click Find Non-Purgeable Items to see what.
Q3: How do I delete all copies of a block at once?
Run QSELECT, set Object type to Block Reference, filter by Name equals your block name, click OK, then press Delete.
Q4: What’s the difference between ERASE and PURGE? ERASE removes block references, the copies you see. PURGE removes the unused block definition stored in the drawing.
Q5: Will deleting blocks reduce my file size? It can. Unused definitions add to file size, so purging them often makes the file smaller, though the result depends on what else is in the drawing.
Q6: Does purging a block delete it from my other drawings? No. Purging only affects the drawing you have open. Other files, including any block you saved with WBLOCK, are untouched.
Q7: Can I purge blocks from the command line?
Yes. Type -PURGE, choose Blocks, enter * for all (or a single name), and answer N to skip confirmations.
Learn how to rename a block in AutoCAD with the RENAME command, wildcards, and -RENAME, plus quick fixes when a block won't...
Learn how to change units in AutoCAD step-by-step. Discover how to use UNITS, -DWGUNITS, and DIMSTYLE to scale drawings and blocks without...
Learn how to make a block in AutoCAD step-by-step. Discover best practices for Layer 0, base point setup, WBLOCK exports, and editing...
Free, short and practical. No spam, unsubscribe anytime.
Thanks! You are on the list.